 Dypressuregauge
Calibration of Pressure Gauges: 5 Proven Steps to Pro
Metrology labs and enterprise reliability teams execute the exact calibration of pressure gauge (k689) instruments by applying the 5-step P.R.O.V.E. protocol to eliminate mechanical hysteresis, verify a 4:1 Test Uncertainty Ratio (TUR), and generate audit-proof digital certificates. Writing a standard operating procedure (SOP) that merely instructs technicians to “pump and check” guarantees severe measurement deviations and instant ISO 17025 audit failures. You must account for metallic elastic creep, hydrostatic head errors, and specific mechanical linkage adjustments to calibrate a pressure gauge (k668) correctly. Let’s break down the exact systematic framework senior metrologists and compliance directors use to calibrate pressure gauges (k802) and secure permanent industrial precision.
The “Dwell Time” Trap Invalidating Your ISO 17025 Audits
Technicians ruin the accuracy of their calibration certificates by recording pressure values the exact second the pump stops. You must enforce a mandatory 30-to-60-second dwell time at each test point to allow internal fluid thermodynamics and mechanical metals to stabilize.
Elastic Creep In Bourdon Tubes
Bourdon tubes continue to expand microscopically even after the hydraulic pump stops moving. This metallurgical phenomenon, known as elastic creep, causes the dial pointer to drift slowly upward for several seconds after reaching the target pressure. If your SOP lacks a mandatory dwell time, technicians will record a falsely low reading. Waiting 30 seconds allows the metal to reach physical equilibrium, giving you the true, stable measurement required for strict compliance.
Hydrostatic Head Pressure Discrepancies
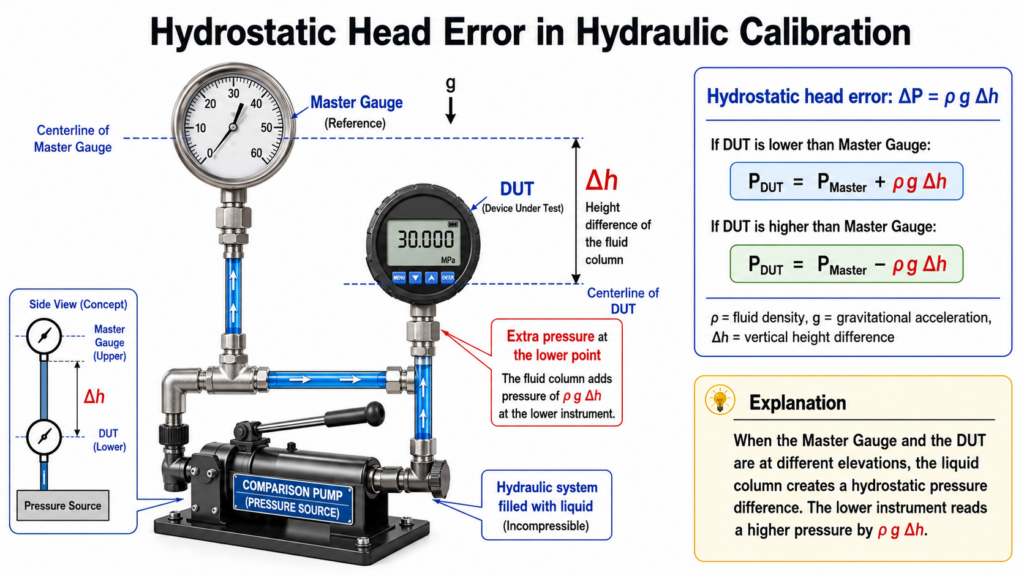
Bench calibrations often fail to translate to field accuracy because lab managers ignore hydrostatic head pressure. If you calibrate a gauge using a liquid medium (like water or oil), any height difference between your master standard and the device under test (DUT) creates a gravity-induced pressure error. A gauge mounted just 10 inches higher than the reference standard in a liquid system will read approximately 0.36 PSI lower due to fluid weight. You must mount the DUT and the master gauge at the exact same horizontal elevation on the test manifold to eliminate this discrepancy.
The P.R.O.V.E. Standard: 5 Steps To Calibrate A Pressure Gauge
Enterprise facilities standardize their instrument maintenance by writing the P.R.O.V.E. (Preparation, Run, Optimization, Verification, Execution) protocol into their official quality manuals. Follow this exact sequence to calibrate pressure gauge (k745) batches flawlessly.
Preparation: Enforcing the 4:1 TUR Rule
You must select a master reference standard that is four times more accurate than the gauge you intend to test. This Test Uncertainty Ratio (TUR) ensures that the inherent error of your calibration equipment does not consume the tolerance of the DUT. If you are testing a 100 PSI industrial gauge with a ±1.0% full-scale accuracy (±1.0 PSI), your master deadweight tester or digital calibrator must possess an accuracy of at least ±0.25% (±0.25 PSI).
Run: The 3-Cycle Stress Relief Method
You must manually exercise the gauge before taking any official readings. Pressurize the gauge to 100% of its full scale, hold it for 10 seconds, and rapidly vent it to zero. Repeat this cycle three times. This “exercising” process relieves temporary mechanical stress built up during shipping or long-term field installation, reseats the pinion gears, and exposes any fatal ruptures in the Bourdon tube prior to the official calibration pressure gauge (k773) data collection.
Optimization: Mechanical Span vs. Zero Adjustments
You fix non-linear scaling errors by physically altering the internal linkage geometry, not just by turning the pointer screw.
If the gauge reads +2 PSI at 25% scale and +2 PSI at 100% scale, you simply adjust the zero screw to shift the entire range down by 2 PSI. However, if the gauge reads exactly accurate at 25% but reads +4 PSI at 100%, you have a span (multiplicative) error. You must remove the dial face, loosen the sector gear linkage, and slide the link arm further away from the pivot point. This mechanical adjustment slows down the needle’s rate of travel across the higher pressure ranges.
Verification: Calculating Acceptable Hysteresis
Calibrating pressure gauges (k865) requires verifying the mechanical elasticity by running the pressure backwards. After hitting 100% scale, step the pressure down to 75%, 50%, and 25%. Compare these descending readings against the ascending readings taken earlier. The difference between the up-run and down-run at the exact same pressure point is the hysteresis. If the hysteresis exceeds the manufacturer’s stated accuracy tolerance, the Bourdon tube has permanently lost its elastic memory. You must scrap the gauge immediately.
Execution: CFR 21 Part 11 Digital Compliance
Finalize the process by generating an unalterable digital certificate. Metrology labs dump paper logbooks to comply with FDA CFR 21 Part 11 regulations. Modern calibration management software (CMS) captures the serial number, the technician’s electronic signature, the ambient room temperature, and the exact deviation data directly from the smart calibrator.
| Phase | Action Item | Pass/Fail Criteria |
| P – Preparation | Select a master reference standard maintaining a 4:1 Test Uncertainty Ratio (TUR). Align the Device Under Test (DUT) and master standard at the exact same horizontal elevation. | PASS: Master standard is ≥ 4x more accurate than the DUT. Zero hydrostatic head height difference exists between units. |
| R – Run | Execute the 3-Cycle Stress Relief Method: Pressurize to 100% of full scale, hold for 10 seconds, and rapidly vent to zero. Repeat 3 times. | PASS: Internal gears are reseated, mechanical stress is relieved, and no fatal Bourdon tube ruptures are exposed. |
| O – Optimization | Correct scaling deviations: Adjust the zero screw for equal errors across the dial. For span (multiplicative) errors, remove dial face and adjust internal link arm distance from the pivot point. | PASS: Pointer readings are accurate at both low (25%) and high (100%) pressure ranges after mechanical linkage adjustment. |
| V – Verification | Run pressure backwards (step down to 75%, 50%, and 25%) and compare these descending readings against the initial ascending readings to calculate mechanical hysteresis. | PASS: Difference between up-run and down-run is within manufacturer’s tolerance. <br>FAIL: Hysteresis exceeds tolerance (scrap gauge immediately). |
| E – Execution | Capture serial number, e-signature, ambient temperature, and exact deviation data via Calibration Management Software (CMS) to generate an unalterable digital certificate. | PASS: Output is a 100% paperless, FDA CFR 21 Part 11 compliant digital certificate synced from the smart calibrator. |
2026 Metrology Trend: Cloud-Synced CMS And Automated Calibrators
The 2026 calibration landscape entirely rejects manual hand pumps in favor of automated, cloud-connected pressure controllers.
Organizations face massive operational bottlenecks when relying on human technicians to manually pump hydraulic jacks and eyeball analog needles. Upgraded 2026 facilities deploy automated calibrators featuring internal electric micro-pumps and Bluetooth connectivity. The technician simply types the target pressures (e.g., 25, 50, 75 PSI) into a rugged tablet. The smart calibrator automatically drives to the exact pressure, holds it for the required dwell time, reads the output via a digital camera or HART protocol, and syncs the pass/fail certificate directly to the enterprise’s SAP or IBM Maximo asset management system.
Lab Case Study: Preventing A $1.2M Pharma Batch Rejection
A flawed SOP almost cost a New Jersey pharmaceutical manufacturer a $1.2 million batch of sterile vaccines in early 2025. The plant’s internal metrology lab passed a critical sanitary pressure gauge using a standard water-based hydraulic test bench.
The lab technician followed the outdated SOP, taking readings immediately without applying a dwell time, and ignored the 12-inch height difference between the master gauge and the DUT. The lab certified the gauge as highly accurate. However, once installed on the bioreactor, the combined elastic creep and hydrostatic errors caused the gauge to read 1.5 PSI higher than the actual tank pressure. The automated steam valve shut off prematurely, nearly failing the required sterilization temperature threshold. Upgrading their corporate quality manual to enforce the P.R.O.V.E. protocol and mandating strict horizontal manifold alignment eliminated these hidden deviations entirely, securing the next production run.
People Also Ask (FAQ)
What is the minimum standard for the calibration of pressure gauges?
The industry standard requires testing at five ascending pressure points (0%, 25%, 50%, 75%, 100%) and four descending points. The master calibrator must maintain a 4:1 Test Uncertainty Ratio (TUR) over the instrument being tested.
How do you fix a span error when you calibrate a pressure gauge?
You fix a span (non-linear) error by removing the dial face and adjusting the internal link arm. Moving the link arm away from the pivot point slows the pointer down; moving it closer to the pivot speeds the pointer up across the scale.
Why must you exercise a gauge before calibrating it?
Exercising a gauge (pressurizing it to 100% and venting it three times) relieves temporary mechanical stress, reseats internal gears, and reveals any severe leaks or hysteresis before you begin recording official data.
How does hydrostatic head pressure affect calibration?
If you use a liquid calibration medium (water or oil), gravity exerts weight on the fluid. If the gauge you are testing sits higher or lower than your master reference gauge on the test bench, the fluid weight creates a false pressure difference.
What is the difference between a zero error and a span error?
A zero error shifts the entire reading equally across the dial (e.g., reading +2 PSI at every checkpoint). A span error increases or decreases as the pressure rises (e.g., reading perfect at 0 PSI, but reading +4 PSI at 100 PSI).
Can you calibrate pressure gauge instruments that show severe hysteresis?
No. Hysteresis indicates that the metal Bourdon tube has stretched and lost its physical elastic memory. Mechanical linkage adjustments cannot fix fatigued metal; the gauge must be replaced.
The prev: How To Calibrate A Metal Stem ThermometerThe next: Can I Use Air Pressure Gauge For Water