 Dypressuregauge
How to Calibrate a Pressure Gauge for 100% Accuracy
You execute a flawless calibration of pressure gauge (k689) instruments by bleeding all trapped air from your hydraulic manifold, setting a true atmospheric zero, and performing a strict 5-point ascending and descending span test using a master calibrator rated at least four times more accurate than your device under test (DUT). Simply pumping the dial to its maximum limit and checking the needle guarantees hidden non-linear errors and guarantees an immediate failure during an ISO 17025 compliance audit. Most technicians mask internal metal fatigue by pulling the pointer off its shaft instead of adjusting the internal linkage. Let’s break down the exact mechanical adjustments and the strict A.Z.S. protocol senior metrology engineers use to calibrate pressure gauges (k802) with 100% verifiable accuracy.
The Hidden Flaws Destroying Your Calibration Accuracy
Technicians sabotage their own calibration efforts by ignoring basic fluid dynamics and mechanical friction before they even turn the pressure pump handle. You must eliminate thermal drift and mechanical binding to capture true readings.
The Adiabatic Heating Trap
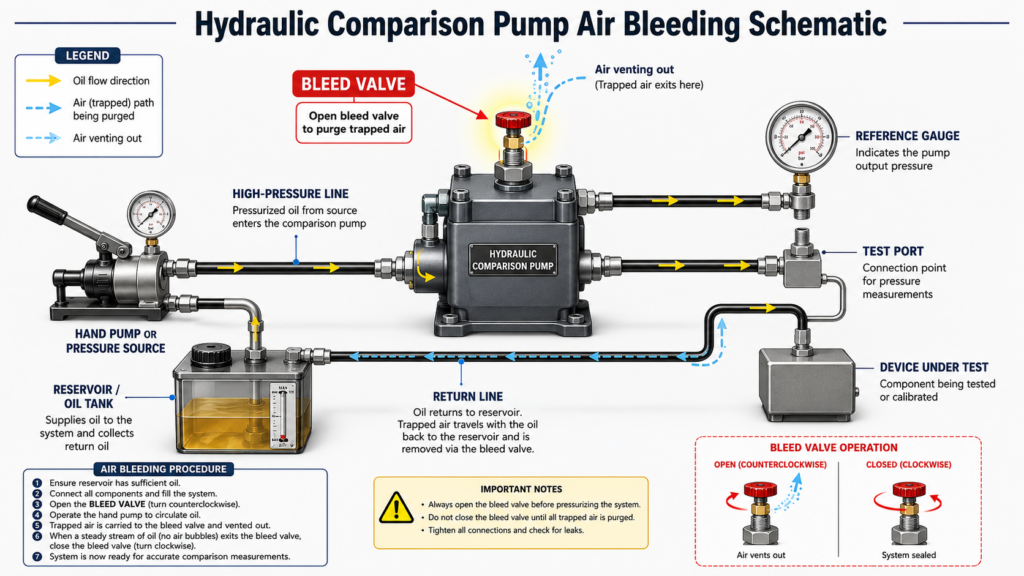
Trapped air inside a hydraulic calibration manifold generates false pressure drops due to adiabatic heating. Air is compressible; hydraulic oil (or water) is not. When your manual pump compresses trapped air bubbles, the kinetic energy instantly generates heat, temporarily spiking the pressure reading on your master reference gauge. Within 60 seconds, that air cools down, and the pressure drops back to its actual physical level. Unsuspecting technicians interpret this sudden drop as a leak in the Bourdon tube and mistakenly scrap a perfectly healthy gauge. You prevent this entirely by opening the bleed valve and flushing pure oil through the manifold before tightening the DUT into the test port.
The Glass-Tapping Fallacy
Tapping the glass face of a pressure gauge during a test hides severely worn internal pinion gears. Technicians tap the casing to overcome internal mechanical friction, forcing a stuck needle to jump to the correct reading. An instrument requiring a physical strike to read accurately fails all modern metrology standards. If a gauge requires tapping, the internal Sector Gear is grinding against the linkage. You must condemn the gauge or replace the entire movement assembly, rather than certifying a sticky dial.
“”TuPian ChaRu”” (提示:在此处插入一张液压比较泵(Hydraulic Comparison Pump)的管路排气示意图,高亮标出排气阀(Bleed Valve)的位置和油液流动方向。)
The A.Z.S. Protocol: The 3-Step Mastery for 100% Precision
Master metrologists execute the A.Z.S. Protocol (Audit, Zero, Span) to calibrate pressure gauge (k745) instruments systematically. You must follow this exact sequential order to isolate the physical errors from the calibration adjustments.
Audit: The 60-Second Leak And Bleed Test
Perform a strict physical audit before attempting any mechanical adjustments. Inspect the threaded inlet for galled threads and check the blowout back for ruptured rubber seals. Mount the gauge onto your master deadweight tester or pneumatic pump. Pressurize the system to 90% of the gauge’s maximum capacity, close the isolation valve, and watch your master digital readout for three minutes. A pressure decay exceeding 0.5% indicates a microscopic pinhole leak in the Bourdon tube. Scrap the gauge immediately; you cannot calibrate pressure gauges (k865) that leak.
Zero: Setting The True Atmospheric Baseline
Adjust the resting pointer to absolute zero under open atmospheric pressure. Vent your test manifold completely so the gauge reads the room’s ambient pressure. Remove the glass bezel. If the pointer rests above or below the zero mark, turn the micro-adjust screw located directly on the pointer hub. For older gauges without a micro-adjust screw, use a specialized pointer puller tool to lift the needle off the pinion shaft, then firmly press it back on pointing exactly at the zero pin.
Span: The 5-Point Linearity And Hysteresis Run
You correct non-linear errors across the entire dial by adjusting the internal span slider. The calibration of pressure gauges (k840) requires testing at five specific checkpoints: 0%, 25%, 50%, 75%, and 100% of the total scale.
Drive the pressure up to exactly 50% using your master gauge. If your DUT reads 52%, the gauge is reading fast. Remove the dial face, loosen the linkage locking screw, and slide the link arm slightly outward (away from the pivot center) to slow down the needle’s travel rate.
Once you hit 100%, you must drop the pressure back down to 75%, 50%, and 25%. Compare the ascending numbers against the descending numbers. A deviation greater than 1% between the up-run and down-run indicates permanent hysteresis (metal fatigue). You cannot fix hysteresis with a screwdriver; the Bourdon tube is ruined.
Span Test (Linearity & Hysteresis Run)
| Target Pressure | Ascending Reading | Descending Reading | Deviation % (Asc vs Desc) | Pass/Fail Status |
| 0% | 0.0% | 0.5% | 0.5% | Pass |
| 25% | 26.0% | 26.5% | 0.5% | Fail (Reading Fast – Needs Adjustment) |
| 50% | 52.0% | 53.5% | 1.5% | Fail (Hysteresis > 1% – Tube Ruined) |
| 75% | 78.0% | 79.5% | 1.5% | Fail (Hysteresis > 1% – Tube Ruined) |
| 100% | 104.0% | N/A | N/A | Fail (Reading Fast – Needs Adjustment) |
Span Test (Linearity & Hysteresis Run)
2026 Shift: Deadweight Testers vs. Automated Smart Calibrators
The 2026 industrial compliance codes are aggressively phasing out manual hand pumps and analog master gauges. FDA-regulated pharmaceutical plants and aerospace facilities now mandate Bluetooth-enabled automated pressure calibrators.
Traditional deadweight testers utilize physical steel weights stacked on a hydraulic piston to generate an exact pressure mathematically. While highly accurate, they rely on a human operator to record the needle position manually. 2026 automated smart calibrators use internal electric micro-pumps to hit exact target pressures within 0.001 PSI. These digital units automatically generate a digital twin of the calibration certificate, logging the exact timestamp, ambient room temperature, and pressure deviation directly to a cloud database. This technology eliminates the manual transcription errors that trigger 80% of ISO audit failures.
Field Case Study: A $15,000 Audit Failure from Ignored Hysteresis
Skipping the descending pressure checks cost a Texas food processing plant a $15,000 batch rejection last October. A junior technician performed a rapid calibration pressure gauge (k773) check on a primary steam sterilization boiler.
He pumped the test bench up to 25, 50, 75, and 100 PSI. The gauge matched the master calibrator perfectly on the way up. He signed the certificate and reinstalled the gauge. During the actual sterilization cycle, the boiler reached 100 PSI and then began cooling down. Because the technician skipped the descending pressure checks, he missed a massive hysteresis error. On the way down, the fatigued Bourdon tube stuck, reading 80 PSI while the actual boiler pressure had dropped to 60 PSI. The automated control system reacted to this false high reading by venting the remaining steam prematurely. The entire batch of canned goods failed the FDA minimum temperature-time requirement and went straight into the dumpster.
People Also Ask (FAQ)
How Do I Adjust A Pressure Gauge That Is Off Zero?
Vent all pressure from the system. Remove the clear front lens. If your gauge has a slotted micro-adjust screw on the pointer head, turn it gently until the needle aligns with zero. If it lacks a screw, use a pointer puller to remove the needle and press it back onto the shaft at zero.
What Is The Standard Standard For Calibrating A Pressure Gauge?
The industry standard dictates testing the gauge at five ascending points (0%, 25%, 50%, 75%, 100%) and four descending points to check for hysteresis. The master calibrator must possess an accuracy ratio of at least 4:1 compared to the gauge under test.
How Often Should Pressure Gauges Be Calibrated?
Most industrial quality control standards (like ISO 9001) require annual calibration. Instruments subjected to high vibration, severe pulsation, or extreme thermal cycling require testing every six months.
Can A Damaged Bourdon Tube Be Repaired During Calibration?
No. If the Bourdon tube fails a leak test, shows permanent plastic deformation (stretching), or exhibits severe hysteresis during the descending pressure check, you must condemn the gauge. Calibration only corrects linkage alignment, not metal fatigue.
Why Does The Pressure Drop Slightly Right After I Pump The Calibrator?
This pressure drop results from adiabatic heating. Compressing trapped air bubbles inside the hydraulic line generates momentary heat, which expands the fluid and spikes the pressure. As the air cools seconds later, the pressure stabilizes and drops. Bleed the air out to stop this.