 Dypressuregauge
Bellow Type Pressure Gauge: Setup & Maintenance Secrets
To properly install and maintain a corrugated‑tube pressure gauge (K772), there are essentially two rules: prevent condensate from entering the internal corrugated tube, and exercise caution with your wrench when tightening the threads. Many beginners treat it like that crude Bourdon tube pressure gauge and handle it carelessly, only to ruin it right away. Remember, this device contains ultra‑thin, membrane‑like metal “accordion tubes” that are specifically designed to measure very low pressures—such as inches of water column or low‑pressure ventilation gases. If you suddenly pump high-pressure compressed air in, or allow condensate to freeze within the metal folds, its internal elasticity will be completely ruined. Today, we’ll break down and explain in detail the installation and venting‑cleaning procedures that seasoned HVAC technicians use in harsh equipment rooms.
A critical installation pitfall: allowing condensate to flood the bellows.
If you install a bellows-type pressure gauge (K535) at the absolute lowest point of a pipeline carrying moist gas, I can assure you it won’t be long before it fails due to metal fatigue. Its interior consists of extremely deep, accordion-like metal pleats.
Under the force of gravity, moisture, compressor oil, and sludge from the pipes will all rush into these deep crevices. Once water accumulates and forms a puddle inside, it creates a stagnant zone. This pool of water not only impedes gas flow, preventing the bellows from expanding uniformly—leading directly to drift in the readings—but what’s even more critical is that, in winter, if the water freezes, the expanding ice will literally crack the thin phosphor‑bronze or brass tube walls. So, take my advice: the drain‑pipe outlet must be installed higher than the main pipe! This way, even if some liquid accidentally enters, it can drain back into the main pipeline by gravity.
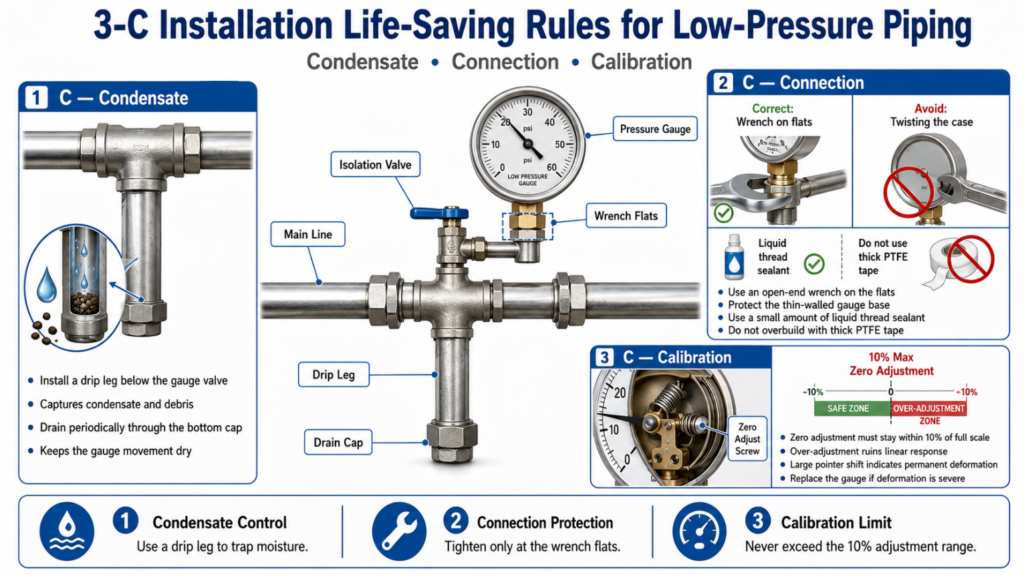
The “3-C” Installation Life-Saving Rules for Low-Pressure Piping
To prevent pressure gauges from failing prematurely, field engineers strictly adhere to the “3-C Rule” (Condensate, Connection, Calibration) during commissioning. As long as these three lines of physical defense are properly implemented, they will safeguard the delicate movement inside.
To address condensate: a drip leg must be installed.
To completely keep moisture out of the gauge head, you should install a short blowdown stub pipe (commonly known as a dirt collector) directly below the pressure gauge isolation valve. Just use a standard tee fitting and connect a vertical pipe section with a cap at the bottom. This vertical “pocket” can precisely capture the water vapor and impurities flowing through the low-pressure pipeline. You only need to unscrew the cap and drain the dirty water once every six months to keep the meter’s interior dry and clean.
Focus on the connection point: protect the thin-walled base.
If you try to twist the pressure gauge’s case with your bare hands, the internal corrugated tube will instantly tear away from the brass base. You must use an open-end wrench to grip the square or hexagonal flat surface at the connection point of the dial’s base! Additionally, simply apply a small amount of liquid thread sealant (pipe-thread sealant) to the NPT threads—do not wrap with that thick white Teflon tape. Because the thick packing tape requires more force to tighten, even a slight lapse in attention can cause you to twist and misalign the entire watch case.
Dynamic calibration spring: Firmly hold the 10% fine-tuning red line.
The bellows pressure gauge (K800) operates by using a calibrated helical spring to counteract the expansion of a metal bellows, thereby enabling accurate readings. If you tighten the internal reverse‑range spring too much, the watch’s linear response will be completely ruined. Some mechanics, upon seeing the pointer deflected, try to “rescue” it by cranking the zero-adjustment screw so hard that they compress the spring to its limit. Remember this: The adjustment range of the zero-setting screw must never exceed 10% of the instrument’s full-scale range! If the pointer deflects even further than this, it indicates that the internal bellows have undergone irreversible plastic deformation—essentially rendered completely inoperable—and there’s nothing left to do but scrap it as waste metal.
New trend of 2026 HVAC: new refrigerants are “strangling” phosphor bronze
In the past two years (2025-2026), everyone has been changing to refrigerants with very low global warming potential (GWP) (such as R-1234ze). But this stuff exposes a fatal weakness of traditional phosphor bronze bellows.
These new synthetic refrigerants, once they encounter a little bit of water vapor remaining in the old HVAC recovery system, will produce a violent chemical reaction, generating hydrofluoric acid and hydrochloric acid. These trace acids are simply disfiguring for traditional copper alloy (bronze/brass) bellows and can corrode thin folds to pinhole leaks in less than 90 days. Therefore, when purchasing engineers match watches for modern water chillers or refrigerant recovery vehicles, 316L stainless steel bellows and stainless steel base are required to be specially used to resist acid pitting.
The painful lesson of the scene: blowing out a watch and losing $14000
Last year in Boston, a positive pressure gradient system in a pharmaceutical clean room was paralyzed because of a repair. At that time, a junior mechanic found that the 0-10 PSI bellows pressure gauge that monitored the supply air duct was a little slow to respond.
The young man thought that the air inlet was blocked by ash, and even the isolation valve of the pressure gauge was not closed. He directly opened the bypass valve and blew the compressed air of the workshop 100 PSI against the sensing pipeline. This sudden super pressure instantly broke the blasting limit of the bellows. The internal metal accordion pipe burst directly, and the dial glass was blown to the other end of the machine room. Not only did the table explode, but it also caused a serious air leak, causing the clean room to lose its ISO 7 certification for 48 hours. The direct loss, including the cost of maintenance and recertification, exceeded $14,000. In fact, the installation of a “press reading valve” (usually in isolation, press down to measure pressure), can perfectly avoid this man-made disaster.
Beginner’s Maintenance Guide: The Safe Exhaust Cleaning Method
If you notice that the bourdon tube pressure gauge has become sluggish, the correct cleaning procedure is to perform a “zero‑pressure backflush”; never attempt to force high‑pressure gas into it. Every year during the major overhaul of the computer room, follow this strict sequence:
First, close the isolation valve and disconnect the pressure gauge from the operating pipeline. Slowly open the relief valve to completely vent the pressure trapped in the gauge base until it drops to absolute atmospheric pressure (zero pressure). Next, use a wrench to grip the brass flat on the base and remove the gauge. Turn the gauge upside down over a water‑catching basin, draw some isopropyl alcohol into a plastic syringe, and gently inject it along the air inlet. Gently shake the pressure gauge to dissolve any oil deposits and contaminants inside, then allow it to air dry naturally. Warning: Never stick a wire or screwdriver into the hole! A few millimeters inside the base is a thin metal bellows; one poke and it’s pierced.
| Action | Frequency | Tools Required |
|---|---|---|
| Drain Drip Leg / Remove Trapped Condensate | Monthly | Bucket, Drain Valve Wrench, Protective Gloves |
| Check Pressure Gauge Zero Position | Monthly | Visual Inspection, Reference Pressure Source |
| Inspect Isolation Valve and Relief Valve Operation | Bi-Annually | Adjustable Wrench, Leak Detection Solution |
| Perform Zero-Pressure Backflush Cleaning | Annually | Wrench, Water-Catching Basin, Plastic Syringe, Isopropyl Alcohol |
| Remove Gauge and Clean Internal Contaminants | Annually During Major Overhaul | Brass Base Wrench, Clean Container, Isopropyl Alcohol |
| Allow Gauge to Air Dry After Cleaning | Annually During Major Overhaul | Clean Dry Area, Dust-Free Cover |
| Verify Gauge Response and Calibration After Maintenance | Annually | Calibration Equipment, Pressure Test Source |
| Avoid Internal Mechanical Damage During Inspection | Every Maintenance Cycle | No Wire or Screwdriver Insertion |
People Also Ask (FAQ)
Bellows pressure gauge how to zero?
Before zeroing, the pressure in the system must be removed. Then open the dial glass and turn the fine adjustment screw on the pointer or linkage. Remember, never adjust more than 10% of the range. If the error is larger than this, the watch has been scrapped. Please replace it directly.
Bellows pressure gauge if overpressure?
The thin metal bellows inside will undergo “plastic deformation” (that is, it will be permanently elongated and cannot be retracted), and if it is serious, it will explode directly. It is not like that thick Bourdon tube. If there is no pressure relief valve installed at the front end, the sudden high-pressure spike can kill it instantly.
Why does my pressure gauge pointer keep jumping?
This is because there are fans, compressors or valves that open and close quickly, resulting in rapid pulsation of the air or liquid flow. The solution is simple: install a mechanical buffer (damper) under the pressure gauge to “smooth” the fluid that washes into the bellows.
Bellows pressure gauge can measure vacuum (negative pressure)?
Yes. The bellows is extremely sensitive to small pressure changes, so it is very suitable for measuring the low vacuum (negative ventilation pressure) in the boiler flue, HVAC duct and clean room.
How often should I clean the internal corrugated folds?
Don’t wash it unless you have to, because the metal folds inside are extremely fragile. At ordinary times, anti-dirty mainly depends on installing blind sewage pipes. If there is any sludge running into the surface, do a gentle liquid flushing once a year on the line, do not take any sharp metal tools to poke.