 Dypressuregauge
How to Calibrate Vacuum, Differential & Bourdon Gauges
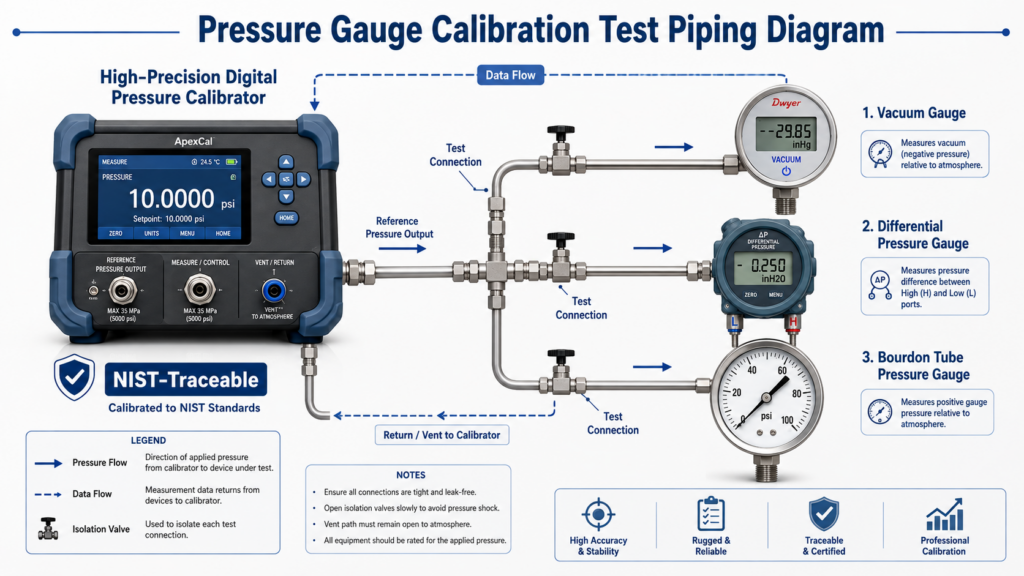
Whether it is calibrating a vacuum gauge, a differential pressure gauge or a Bourdon tube (spring tube) pressure gauge, the core step is to compare the meter readings with standard parts (such as piston pressure gauges or high-precision digital calibrators) that can be traced to NIST (National Institute of Standards and Technology). At least 5 test points must be filled in between: 0%, 25%, 50%, 75% and 100% of the full scale. For Baudon tube, the key to accurate calibration lies in how to skillfully adjust the internal mechanical connecting rod to correct the measuring range and linearity. As for the vacuum gauge, you must stick to the rule of “stabilizing the pressure for 60 seconds”, otherwise the temperature error caused by the adiabatic effect will make you lose all your previous efforts. As for the differential pressure gauge, the focus is on strict static pressure balance control and liquid level static pressure compensation.
Did you know that in petrochemical plants, about 40% of the pressure gauges fail to be calibrated, not because the gauges are broken, but because the testing methods are too rough and the hysteresis (return difference) and ambient temperature gradient are not well controlled. Let’s disassemble the hard core engineering procedures of these three types of pressure gauges and see how to meet the extremely strict tolerance requirements without any difference.
The “Z-S-L Triangle” Rule Of Pressure Instruments
Once the technician starts guessing which part to adjust, the calibration of the mechanical watch is basically useless. The triangle rule of Z-S-L (zero point, range, linearity) stipulates a set of dead rules: connecting rod adjustment must be done in sequence, not negotiable.
Zero Shift: This is the parallel displacement across the dial scale. This must be done first, just adjust the installation position of the pointer directly.
Span Error: When the pressure is 1, the error becomes larger (or smaller) in equal proportion. This is the second step, which is corrected by changing the effective length of the connecting rod of the Bunden tube connected to the sector gear.
Linear error (Linearity Error): The characteristic is zero error at both ends, but one error bulged out in the middle of the scale. This should be placed in the final treatment, the way is to turn the entire movement, adjust its rotation angle.
You have to know that if you move the range, the linearity will change accordingly. In turn, the linearity will be adjusted and the range will run again. So honestly follow the Z-S-L order, otherwise you will fall into the endless cycle of “robbing the east wall to make up for the west wall”. This is how many novice meters are broken.
How To Calibrate A Bourdon Tube Pressure Gauge
Calibrating this thing is essentially to separate the physical expansion of the C- tube from the rotational movement of the pointer. You have to knock the mechanical linkage inside. It is not enough to pull a pointer to zero.
As-Found Sweep: Pressurize with a hydraulic calibration bench to 0%, 25%, 50%, 75% and 100 of full scale, respectively. Boost and buck 1 circle down, write down the deviation, and see how much mechanical hysteresis there is.
Zero Alignment: Venting the system completely. Take the special needle lifting device to pull the pointer off, and then firmly re-installed in the real zero position.
Span Adjustment: hit 100 percent full scale in one go. If the watch is on the high side (for example, the range of 100 PSI points to 102 PSI), the transmission ratio of the connecting rod is too fast. At this time, the connecting rod connected to the tail of the sector gear must be elongated. If the reading is low, shorten the connecting rod.
Linearity test (Linearity Verification): Reduce the pressure to half (50%). If there is no problem with the zero point and the measuring range, but the middle point deviates, it means that the sector gear and the pinion gear are not in the tangent position in the middle of the stroke. The solution is to rotate the entire movement and change the thrust angle of the connecting rod.
Final As-Left Run: Re-run the previous five-point calibration test 1 times. At this time, both the boost and buck values must fall steadily into the accuracy grade specified by the manufacturer (such as grade 1A of ASME B40.100).
How To Calibrate A Vacuum Pressure Gauge
The success or failure of vacuum gauge calibration depends on how you deal with the “adiabatic effect”. If the vacuum is pumped too hard, the temperature in the test chamber will plummet instantly, causing the standard to measure a false, fleeting pressure drop.
Establish thermal balance: use a set of highly sealed calibration lines to connect the vacuum gauge, standard device and vacuum pump. Every time you pump down 20% of the vacuum, you stop and wait for 60 seconds. This waiting effort is to resynchronize the gas temperature with the room temperature, and when the gas molecular density stabilizes, the real pressure is measured.
Control air pressure fluctuation: absolute pressure calibration is to compensate for atmospheric pressure at all times. Record the ambient air pressure in the lab before you start. When calibrating a high-precision vacuum transmitter, even if the air pressure in the room only changes by 1 hPa, the calibration result will follow the deviation.
Return test: pump the system to maximum negative pressure (e. g. -14.7 psi or -1 bar). Then, slowly put the dried filtered nitrogen back into the pipeline and measure the pressure drop points one by one. Don’t put it directly into the indoor air here. There is moisture in the air. If the moisture 1 evaporates in a vacuum environment, your calibration stability will be completely destroyed.
How To Calibrate A Differential Pressure Gauge
The calibration differential pressure gauge (DP) has a hard rule: it must be measured under the static pressure environment when it is actually working. If only the high-pressure side is suppressed and the low-pressure side is directly exposed to the atmosphere, the measured number cannot be used at all.
Apply static pressure (common mode test): first open the balance valve on the differential pressure gauge valve group. Apply full static pressure (e. g. 1,000 PSI) in the pipeline to both high pressure (H) and low pressure (L) ports. This time the table must refer to the absolute zero point. If it is off, adjust the zero screw quickly. This step is extremely critical and can directly eliminate the common mode error caused by the extrusion and deformation of the measuring diaphragm due to high ambient pressure.
Isolate and input the differential pressure: close the balance valve. The low pressure side maintains the original static pressure, and then uses a high-resolution pneumatic controller to pressurize the high pressure side up a little bit.
Static pressure compensation of liquid column: if the wet pressure guide pipe (wet leg) is installed on site, the vertical liquid inside the pressure guide pipe is also under pressure. You have to calculate the pressure head of this liquid column (p = ρ g h) and deduct it from the calibration reference. If you forget to input this specific gravity offset to the intelligent differential pressure transmitter, it will be wrong to measure it on site.
Calibration Equipment Comparison: Pneumatic Controller vs. Deadweight Tester vs. Digital Calibrator
| Calibration Equipment | Pros | Cons | Application: Vacuum | Application: Differential Pressure (DP) | Application: Bourdon Tube (Analog) | Applicable Accuracy Range | Response Time |
| Pneumatic Controller (气动校验仪) | • Clean medium (no oil contamination) • Highly precise, continuous pressure adjustment • Excellent stability at low pressures | • Requires stable external gas/air supply • Limited to low/medium pressures (typically <3,000 PSI) • Sensitive to micro-leaks in fittings | Excellent: Highly effective for drawing and holding precise, stable vacuum levels using internal venturi or external pumps. | Ideal: Provides the high-resolution pneumatic control required to incrementally increase High-port pressure while maintaining Static Pressure on the Low port. | Good: Great for low-to-medium pressure gas Bourdon tubes; unsuitable for high-pressure hydraulic tubes. | 0.01% to 0.05% FS (Full Scale) | Fast (Typically 2–5 seconds to stabilize target pressure) |
| Deadweight Tester (DWT) (静重式压力计) | • Primary standard (highest possible accuracy) • Measures % of Reading (not FS) • No electrical power required • Extremely stable over time | • Heavy and lacks portability • Requires complex local gravity, temperature, and buoyancy corrections • Very slow manual operation | Poor / Complex: Requires highly specialized, cumbersome negative-pressure DWT models. Rarely used for standard vacuum calibration. | Extremely Difficult: Simulating high static line pressure while applying a tiny differential requires a complex, highly specialized Twin-DWT setup. | Excellent: The absolute gold standard for calibrating high-pressure hydraulic Bourdon tube gauges (up to 10,000+ PSI). | 0.005% to 0.015% of Reading (Primary Standard) | Slow (15–30 seconds per point for weight loading and fluid stabilization) |
| High-Precision Digital Calibrator (高精度数字校验仪) | • Highly portable and fully automated • Built-in electrical I/O (mA/V) for smart transmitters • Built-in calculation for specific gravity / offsets | • Secondary standard (requires periodic recalibration due to drift) • Battery dependent • Sensor modules can be damaged by extreme overpressure | Excellent: Pairs seamlessly with internal electric pumps or external hand pumps for instant, real-time vacuum readings. | Excellent: Automatically calculates liquid head pressure (P=ρ⋅g⋅hP=ρ⋅g⋅h) offsets for wet-legs and easily tracks zero-shift deviations under high common-mode static pressure. | Good: Instant digital readout makes visual needle-drop comparison easy, though generating pressure requires an external hand pump. | 0.01% to 0.025% FS (Depending on interchangeable modules) | Very Fast (Real-time digital update, <1 second) |
Case Study: 2025 Gulf Of Mexico Petrochemical Plant Static Pressure Failure
There was an oil refinery in Texas that had a headache before. The flow measurement of their distillation column was always inaccurate. The loss of light efficiency in a year was almost 120000 US dollars. After checking for half a day, it was found that the instrument workers in the factory used to calibrate the differential pressure transmitter on the workbench, and the low pressure side was directly exposed to the atmosphere. Later, we directly brought the field calibration equipment capable of hitting 3,000 PSI static pressure. Under real static pressure load, boy, the zero point of these transmitters is directly floating by 1.8 due to diaphragm deformation. After recalibrating in strict accordance with the total balance static pressure regulation, not only the zero offset is solved, but also the flow measurement accuracy is firmly stuck back to within 0.1% of the error margin.
Frequently Asked Questions (Frequently Asked)
Q1: How long does the Bourdon tube pressure gauge need to be calibrated?
If it is used normally, it can be calibrated once every 12 months. However, if the instrument is under the harsh working conditions of severe pulsation, particularly large vibration, or sudden cold and hot temperature, it must be shortened to once every 6 months, mainly to find out the metal fatigue problem of the C- tube as soon as possible.
Q2: What is the standard accuracy of vacuum pressure gauges?
Industrial vacuum gauges usually conform to ASME Class B (3/2/3% of range) or Class 1A (1% of full scale). If it is a high-precision reference vacuum transmitter for laboratory use, the requirement is high, and the accuracy must reach +/-0.05 of the measuring range. This kind of transmitter must be calibrated with a piston pressure gauge, a primary standard.
Q3: Can I calibrate the differential pressure gauge directly without valve group?
Absolutely not, the risk is too great. Without the valve group, it is very easy to burst one side of the bellows (one-way overpressure). Whether it is a three-valve group or a five-valve group, it is necessary to safely balance the static pressure on both sides before and after the injection of the differential pressure test pressure.
Q4: Why does my Borden meter pointer not return to zero?
The pointer does not return to zero, indicating a mechanical zero offset. This is often caused by instantaneous overpressure (pressure spike) or sudden pressure relief (water hammer effect). At this time, don’t try to save trouble and break the pointer back by hand. Honestly do a complete Z-S-L (zero-range-linearity) mechanical debugging, by the way, check whether the structure of the pipe is damaged.
Q5: What equipment is needed to calibrate differential pressure transmitters?
You need a high-precision digital pressure calibrator (or piston pressure gauge), a dedicated pneumatic or hydraulic test pump, and a valve block with balancing valves. If the calibration is an intelligent differential pressure transmitter and digital fine adjustment is required, a HART manual operator must be prepared.
Q6: Does temperature affect the calibration of pressure gauges?
It has a significant impact. 1 the temperature fluctuates, the modulus of elasticity of the Boughen tube metal will change, as will the density of the calibration liquid. Therefore, the calibration work must be done in a temperature-controlled measurement laboratory (usually 20 C 2 C), and before the test, the instrument must be allowed to stand in the environment for 24 hours to completely adapt to the temperature.